woensdag 28 augustus 2013

Weltenraum Nahkampf Gefechtseinheit Ausf. B 'Ollie' - part II

I was torturing myself over how to build an engine for the thing, when I found an engineblock from a 1/12 bike. I got the bike for free at a secondhand store because the guy didn't think it would sell.
Now I can prove to my wife that there's good reason to take in extra (built) models :P


I found the thrusters in a bag full of detail stuff for this build, didn't remember I had that bag.

Then I made two extra thrusters and added some more detail stuff and cables to the engine. It'll need more detailing, and especially more cables, thinner ones.


And I made a sensor array thingy from helicopter parts and small scale ship parts, the rigging mostly:


Which I think fits quite nicely


 The gun just got some filling done, I don't think I'll do much more to it than that. (well, sanding of course)


Almost done, fun to get into a sorta building spree.

dinsdag 27 augustus 2013

Weltenraum Nahkampf Gefechtseinheit Ausf. B 'Ollie'

Started years ago, this was shelved because I wasn't happy with it.
It's loosely based on this drawing from Der Zweite Plan (can't find the site anymore :S )


I recently rediscovered it and I am going to finish it as quickly as possible, to have something else done and to try some painting.

I decided to call it  " Weltenraum Nahkampf Gefechtseinheit Ausf. B 'Ollie' "
Which is German for " close-range space fighter version B 'Ollie' "
I like the sound of German for these things, though my German is pretty bad.
Big thanks to Struschie for helping me with the name.

This is how I found it:


It also has a gun, that mates with the big round lump on the right side of the craft


Panel lines are not prefect, but I'm not going to take the effort to change that.
I'm going to quickly add and engine and some thrusters, an antenna array and finish the gun.
Just something quick in the midst of all these long, long projects.

Some WIP photos of the build

It's essentially made from an egg, a table tennis ball and a Me 109.

It was supposed to get an open cockpit with the pilot standing in front of it, but I made a couple of mistakes and it was too much work to get it too work after that.


And some of the gun:


dinsdag 20 augustus 2013

Nixe! Part II

Not sure about the pose yet, he'll be carrying some heavy equipment. Maybe a couple of panzerfausts and a large case or something.
Added the chest sensor, too symmetrical for my taste, but I don't want to chance it again.
Added the lower arm parts for the claws, weld joints, engine cover (made a milliput copy, a lot of work to get right...), radar and sensor bulbs, and the weird round thing he has on his hunch.
I found a piece of a 1/9 (I think) harley that was perfect for the engine cover.


 Slow but steady wins the race right?

To do:
- joint covers
- weapons/equipment
- cables/tubes
- radar bulb
- antenna bulb
- engine cover
- exhaust thingy
- claws
- optical sensor thingies
- antenna
- pilot
- hatch sensors


1/20 Nixe!

Ever since seeing Chris Turners excellent Glockner, I wanted to make a Nixe variant with the PKA1 claws instead of the hand and gun it normally has (Example).

To build a Nixe, one needs a melusine and a fliege. Having neither and not wanting to combine two quite expensive kits, I opted to make one from leftover gustav parts I got in a trade and a fliege I bought to nixe-fy.


The engine compartment and the hip pieces came from the gustav parts, the lower arms and claws from PKA H leftovers.

Because the legs seemed too thin, I bulked them with 1mm plastic sheet.
This was also done for the lower arms because it was the easy solution to make them round instead of eliptical.

To further bulk out the lower legs, 0.75mm plastic sheet was atached to the front. I didn't have spares for the cable holders, so I made some from 1/72 bombs and plastic rod.

I used 2mm aluminium rod to attach and pose the arms and legs, I will be sculpting joint covers myself I guess.

To do:
- joint covers
- weapons/equipment
- cables/tubes
- radar bulb
- antenna bulb
- engine cover
- exhaust thingy
- claws
- optical sensor thingies

vrijdag 16 augustus 2013

The story of +(deca)HELL

I have been wanting to build a Makoto Kobayashi design for ages, but the resin kits were always too expensive and scratchbuilding/sculpting seemed too much of a hassle.

Kobayashi design hold some special appeal for me, similar to Kow Yokoyama's designs, big, rusty, organic, ungraceful and often a-symmetrical, they  fill a niche that none of the major genres can touch.

When I got some scans from the Hyperweapon 2008 book, I immediately fell in love with the Alaya build of +(deca)HELL.


I'm not sure if it was a Kobayashi design built by Alaya, or something Kobayashi liked so much he put it in his book (my Japanese is quite non-existent).
Whichever the case, I wanted to have one. With no resin kits available and the design not too complicated, I decided to plunge in and build it myself.

Not knowing which parts were used for the legs, I started on an old MG Zaku I and remodeled the legs to a similar shape. Using most of the rest of the kit to build the rest of +(deca)HELL.


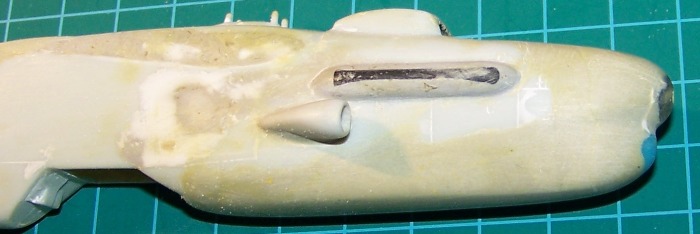
The shell was built from some warship and spaceship hullplates and a whole load of putty.
Panel lines were added in blocked lines to break up the big flat surface and to contrast and enhance the curves. The shell was filled with 1/12 motorcycle part, 1/24 rally car parts, and some greebles form the spares bin.


In the mean time, Francesco Benedettini from patopazzo told me where to find Alaya's blog, where multiple WIP pictures could be found.
Sadly I was already way too far into building it using different donor kits than the original, so it was going to look quite different.


Of course there was also a big-ass gun, no robot would be complete without ^_^


I primed the model black with Army Painter, known for it's robustness.


And in the end, after many layers of paint and washes, but little in the way of pictures, it was done.


I still need to redo the panel lines, just darken them a bit more.
Maybe add some more dust and muck to the legs too...

But it's about as done as I wanted it.
It won me a Borderbreak Cougar in an online modification competition, so I can't complain ^_^

On to the next model.